
Get Business Email
No domain name required
In the digital transformation era, having a strong online presence is crucial for any business or individual. One of the most effective ways to do this is by using social media platforms like Facebook. It is the most used online social network worldwide and currently boasts roughly 3 billion monthly active users.
Despite its large user base and potential advantages, not using Facebook means missing opportunities to engage with clients. However, creating a Facebook business page may look challenging, but with proper guidance, you can make it possible.
If you are one of those who want to create a business page on Facebook, do so with ease. Then, you are in the right place. This article will provide a comprehensive process to create a Facebook page for your business in 10 easy steps.
Understanding a Facebook Business Page
A Facebook Business Page is a public Facebook profile used by businesses, organizations, and public figures to promote their products, services, or events. This page is central to any Facebook marketing strategy, where users interact with content from their favorite brands, businesses, and creators. A Facebook business page is used for several activities, such as:
- Run Facebook ads,
- Open a Facebook shop,
- Share important information,
- Promoting products, services, and events,
- Connect with existing customers, and
- Reach potential customers.
By setting up a business page, a user gains access to other Facebook Commerce and advertising tools.
What Distinguishes a Facebook Page from a Business Page?
These are the quick differences between them:
How to Create a Facebook Business Page in X Easy Steps
Creating a Facebook business page is a simple process; you only need to follow these simple steps:
Step 1: Use a Personal Facebook Account or Create a New One.
The Facebook business page is completely different from the Facebook profiles or users. It is usually managed by personal accounts called page administrators; multiple admins are allowed. To proceed, you can use your existing personal Facebook account or create a new one.
- Log into your Facebook account.
- Click on the “Pages” menu from your homepage’s left-hand panel.
- You will see a dashboard to manage your pages and profiles.
- Click the “Create New Page” button under “Your Pages and Profiles.”
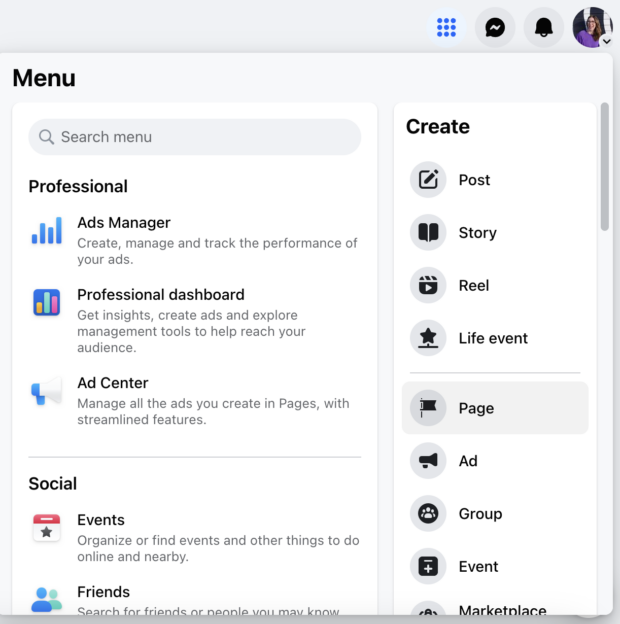
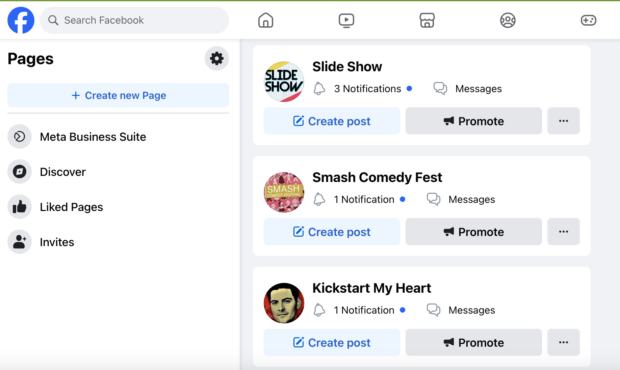
Step 2: Enter Basic Information about Your Business
Next, it’s time to enter some basic information about your business, including your business name, categories, and bio.
- Add your business name first, followed by categories up to three, and then your bio.
- Once done, click on the “Create Page” button.
- You must look at the Page Preview before proceeding to the next step.
- Click on the blue button “Create Page.”
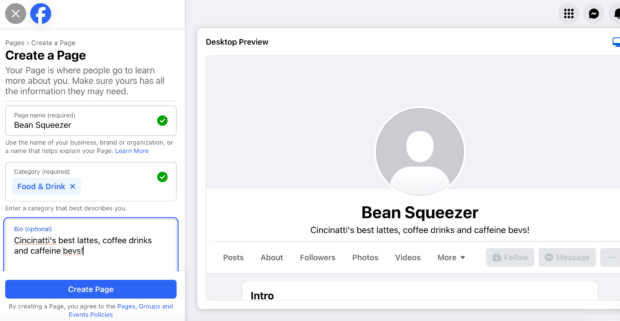
Note: Remember, you can change the categories for your business page later, but the name of your page is forever.
Step 3: Include Your Business Contact Details
Once the page is created, it’s time to make it more informative by including contact details about your business. To complete the process, you need to enter the following details, including:
- Website,
- Phone number,
- Email address,
- The physical address, and
- Operating hours.
Note: You can edit, change, or even delete this information.
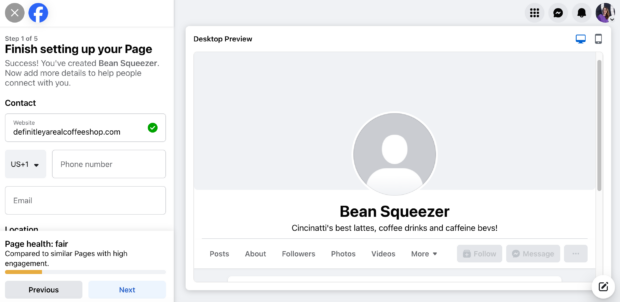
After filling out the contact details, click on the “Next” button to move on to the next step of your Page setup.
Step 4: Add Images and an Action Button
In this step, first, you need to add high-quality images, which will help you customize your page. Images are the visual representation of your page, making a lasting impression on your audience. However, it’s crucial to choose images relevant to your brand and easily memorable.
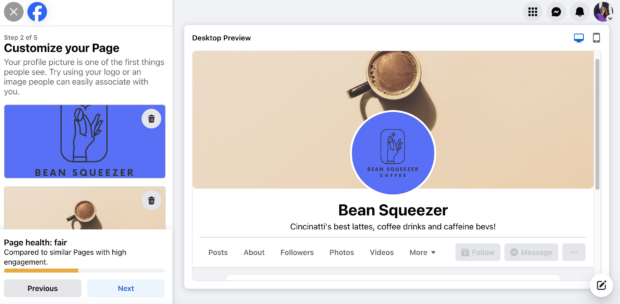
Profile Image
- Minimum size: 180 x 180 pixels.
- It will be displayed as a circle, so avoid important details in the corners.
- Use your brand's logo for instant recognition.
- Local businesses can use a picture of the storefront, owners, or best offering.
Cover Photo
- Recommended size: 820 x 312 pixels.
- Smaller photos will appear stretched and distorted.
- Use templates from photo editing tools like Canva for the correct size.
You can also add an “Action Button” underneath the spots where you uploaded your photos. This button will direct page visitors to the actions you want them to take, like “Start Order,” “Get Tickets,” or “Send Feedback.”

Step 5: Connect to WhatsApp
After adding visuals, you’ll have the option to connect your business Page to WhatsApp (optional). To incorporate a “WhatsApp” button into your page, click on the “Send Code.” You’ll get a confirmation code on your WhatsApp number and send an invite to your friends.
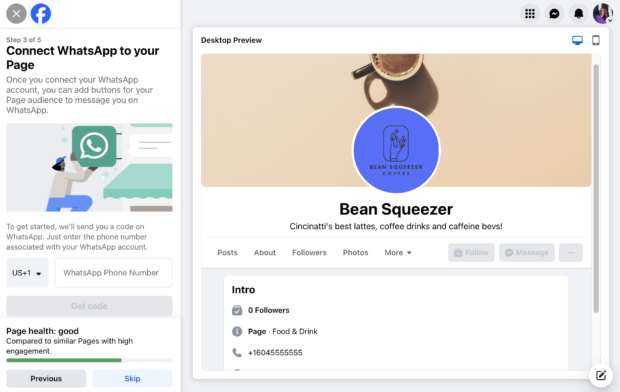
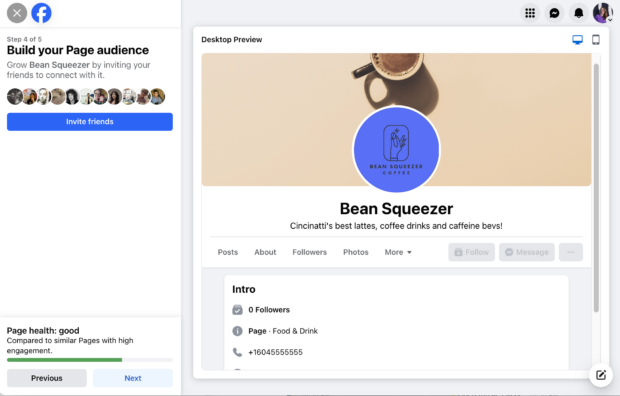
If you don’t want to connect to WhatsApp, click the “Skip” button to move on to the next step.
Step 6: Setting Up Your Notification Preferences
If you want to stay updated on your business page activity, then turn on the “Page notifications on your profile” link. After hitting this button, you will get all updates about your Facebook business Page, even when logged in to your account.
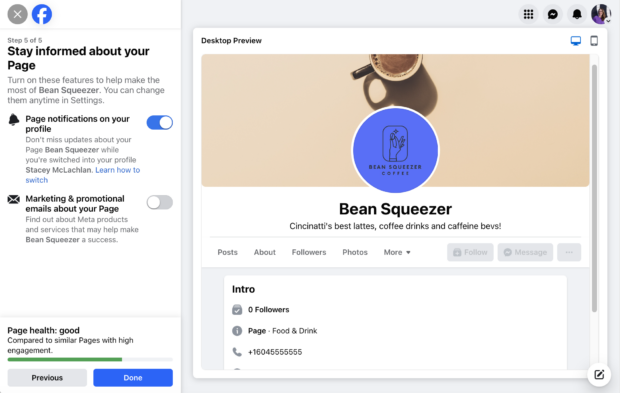
You can also choose to receive or not receive marketing and promotional materials and Meta product updates here. Do you love getting emails? Opt in! Once you’re finished, click “Done!”
Step 7: Customize Your Facebook Business Page
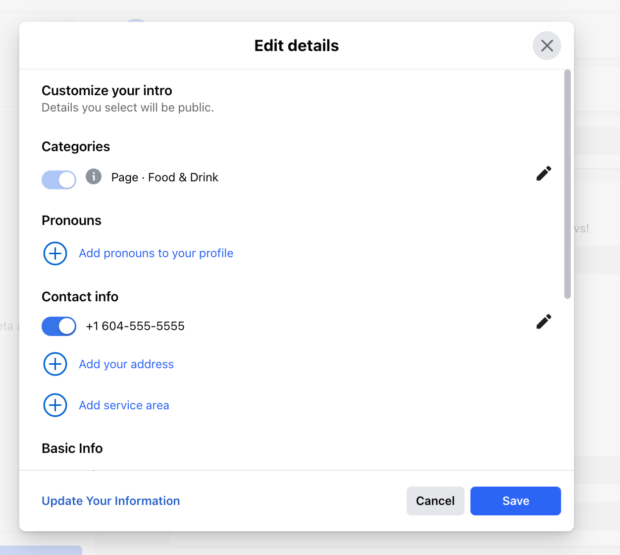
Although you just hit the “Done” button, there’s still some optional work. Yes, there are some additional changes to make to make your Facebook Business Page personalized, including:
- Click on the “Edit details” button to add more information for your followers.
- Toggle your contact information on or off.
- Add details about your service areas.
- Include a price range or details about your services.
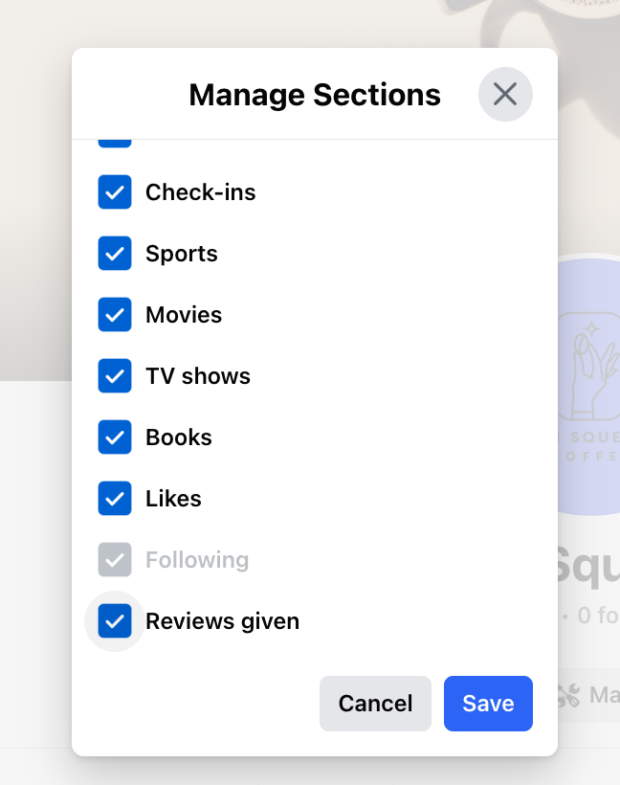
Moreover, you can click on “More” and then “Manage sections” in the top menu to remove sections from public view, like “Reviews given,” if you prefer.
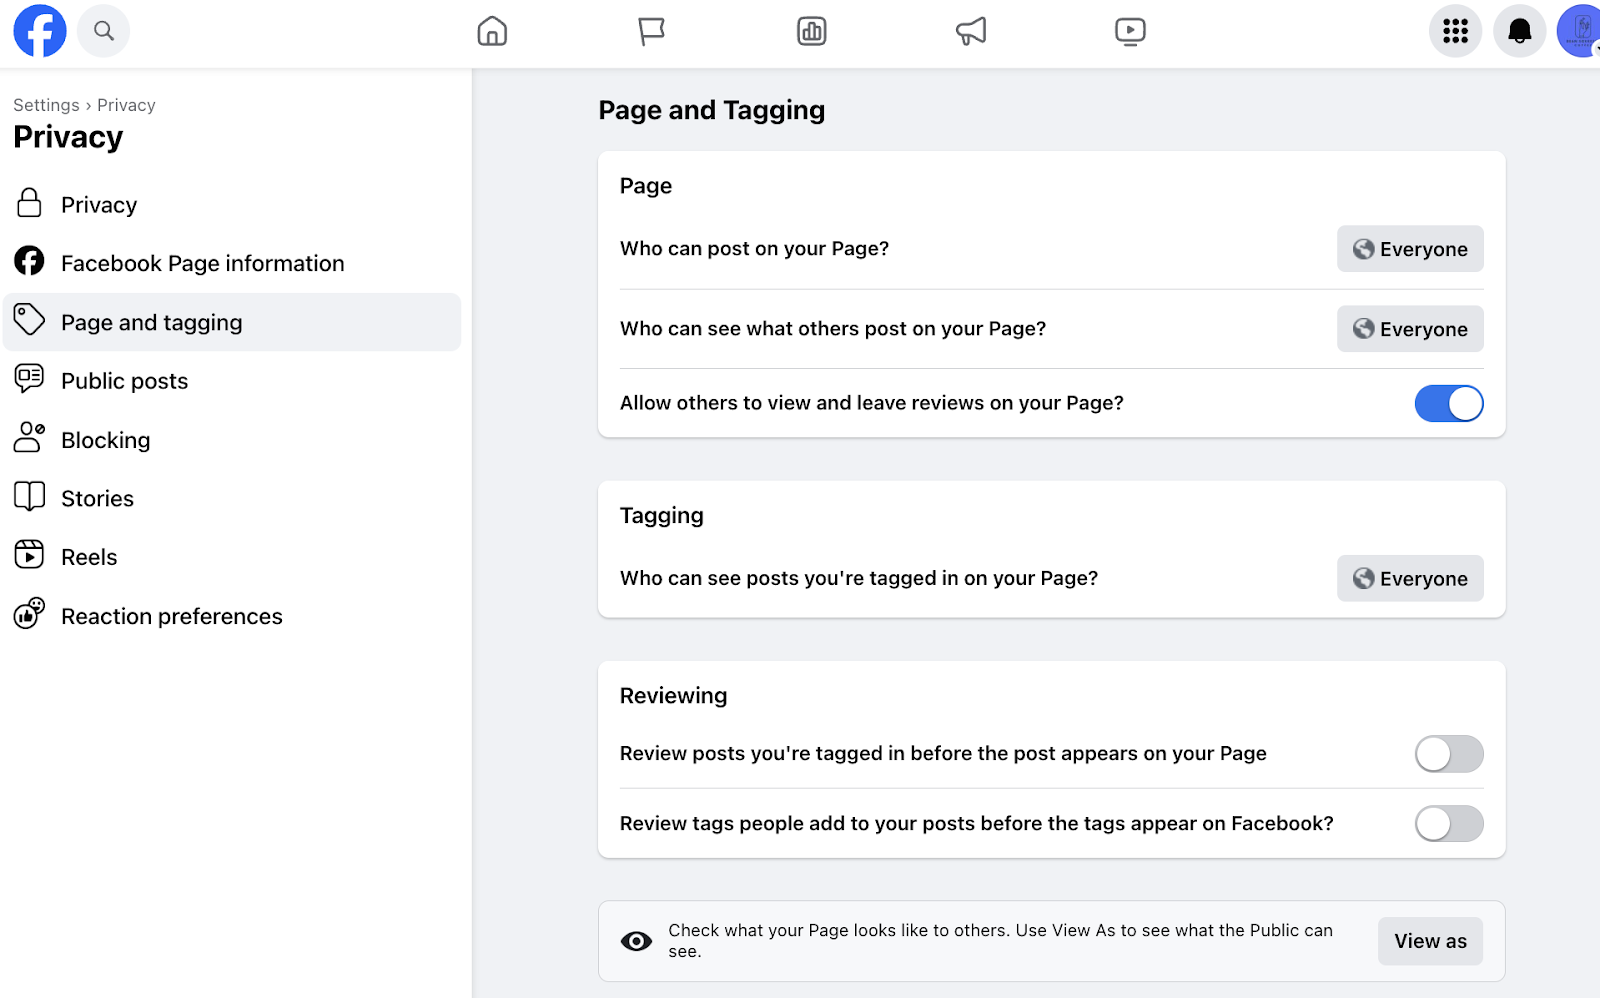
Step 8: Configuring Your Privacy Settings
You can adjust your privacy setting by clicking on “Settings” on the left side of the page and then “Privacy.” These settings are easily manageable and enable you to turn them on and off at any time.
Step 9: Link Your Instagram Profile
If you are operating an Instagram Business Page, then it’s better to connect it with your Facebook. It allows you to manage things on both platforms simultaneously. If you want to connect to Facebook and Instagram, check out “Settings” and then “Linked Accounts." Now, hit “Connect Account” and follow the prompts to complete the process.

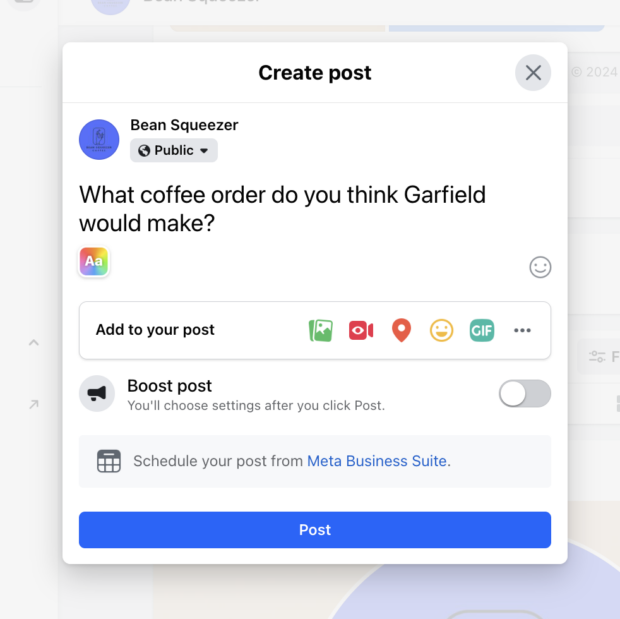
Step 10: Make Your First Post
Now that you’ve created a Facebook Business Page, it’s time to post compelling content on it. To create an engaging post, use text, add images, share links, conduct polls, or even a live meet. Here are some ideas for creating your first post:
- Create a welcome post by including essential information about your business.
- Share behind-the-scenes images of your team building products, offering services, etc.
- Incorporate links to written content, such as blog posts, ebooks, etc.; this helps your page provide valuable information.
How to Add an Admin to a Facebook Business Page?
To initiate the process, ensure you must be an admin to create another admin. If you aren’t an admin on Facebook, then ask your admin to change your page role and proceed. These are the steps that you need to follow if you want to add an administrator to your Facebook Business Page:
Step 1: Log into Facebook
First, log into your Facebook account. Now, click on the “blue arrow” in the upper right corner of the screen. Select the “Manage Pages” tab from the drop-down menu. If your business Page appears in the “Pages” section, click on it.
Step 2: Hit Settings at the Top of Your Page
In the upper corner of your screen, a “Settings” button appears; click it. Now, make changes to your “Page Roles.”
Step 3: Access Page Roles
Go to your Business Page dashboard. Click on “Page Roles” in the left column.
Step 4: Assign a New Page
On the right, find “Assign a New Page Role.” Toggle the role from “Editor” to “Admin.” The new admin will receive a notification to accept the invitation.
Note: New admins may need to like your Facebook Page first.
Step 5: Update Existing Page Roles
Select “Existing Page Roles.” Next, change the member's role to “Admin.” Confirm the role change to update their permissions.
Step 6: Confirm with a Password
Enter your Facebook password to confirm adding an admin. This security step prevents unauthorized changes. Once confirmed, the new admins can start managing your Facebook Business Page.
How to Delete a Facebook Business Page?
Deleting a Facebook Business Page is as simple as deleting your Gmail account. To delete or remove your Facebook Business Page, you need to follow these simple steps:
Step 1: Log in to your Facebook Business Page
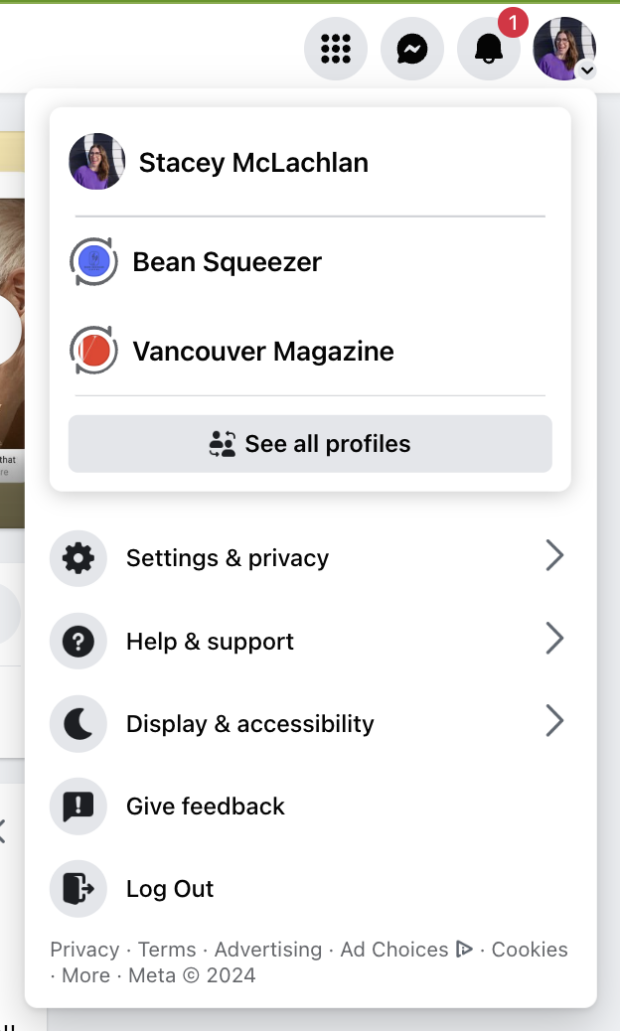
Click on your “Profile Picture” in the top corner of your Facebook account. Now, hit your Facebook Business Page from the drop-down menu. In the next step, tap the name of your business page in the left menu to open it and access the admin menu.
Step 2: Search for the Delete or Deactivate Menu
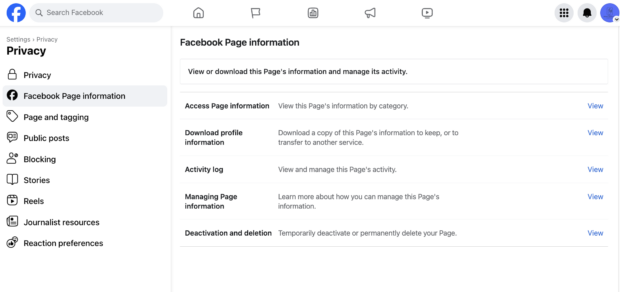
Go to Settings > Privacy in the left-hand menu of your Facebook Page. Click on the “Facebook Page Information” link.
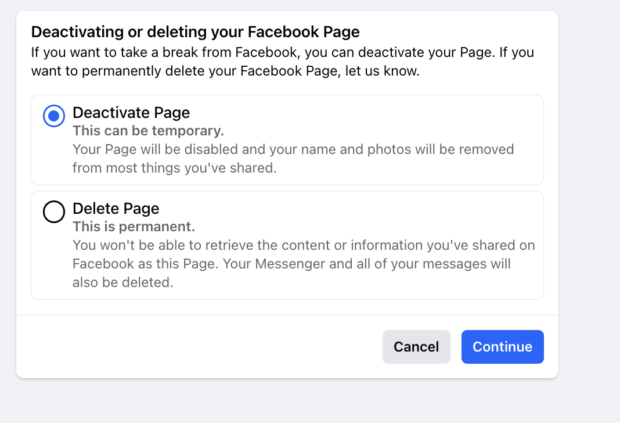
You’ll find options to either temporarily deactivate or permanently delete your page. If you deactivate, your page will be disabled but can be reactivated later. If you delete it, your page and Messenger messages will be gone forever. Confirm your choice with your password.
Wrapping Up,
Consequently, setting up your Facebook Business Page is a simple process. Following these 10 easy steps will help you establish a strong online presence for your business. Additionally, you can connect with your family, friends, and potential customers with just a few clicks.
However, once you've got your Facebook Page, it’s essential to be consistent with your business content. Remember, don’t spend too much time on your page customization and boosting your followers. Your primary focus should be on quality and relevant content that helps your audience. So, what are you waiting for? Get started today and watch your page succeed and flourish in the world of social media.
Frequently Asked Questions (FAQs)
1. Can I get a free Facebook business page?
Yes, you can get a free Facebook Page. Use it to add all the information related to your business without spending a dime; however, if you need to pay to advertise your page or to promote posts,
2. Can I separate my Facebook Business Page from my account?
Yes, even though managing your Facebook Business page requires a personal account, the two are not publicly linked.
3. What is the suggested size for the cover photo on a Facebook page?
The Facebook Page cover photo size is 820 x 312 pixels for desktop and 640 x 360 pixels for mobile. However, this size can be changed often, so please confirm it while creating your Facebook Business Page.
4. Is it really necessary to have a personal Facebook account to set up a Business Page?
Yes, you need a personal Facebook account to create a Business Page. Your account will manage the page and act as the Page administrator.
5. Can I change the name of my Facebook Business Page after creating it?
No, you can’t change the name of your Facebook Business Page once it’s created. Your name will be permanent during the setup process, so choose wisely.
6. How many people can be admins of a Facebook Business Page?
There’s no limit to the number of admins for your Facebook Business Pages. You can assign multiple personal accounts as admins to manage the Page.
7. How do I delete or deactivate my Facebook business page?
To permanently delete your Facebook Business Page, go to Settings > Page Info and select the "Permanently Delete Page" option. To temporarily deactivate it, select the "Unpublish Page" option instead.

Get Business Email
No domain name required


%20_%20In%20X%20Easy%20Steps.png)
.svg%201.svg)
.svg)
.svg)
.svg%201.svg)


