
Get Business Email
No domain name required
Communication is the key to the ever-changing world of email communication. Access to the shared mailboxes is one of the powerful features of Outlook that promotes teamwork and communication.
In this detailed guide, we will provide step-by-step information on how to add a shared mailbox in Outlook. This will help you manage your multiple email accounts or enhance your experience if you are a part of the collaborative team.
Understanding Shared Mailbox
A shared mailbox is a single, centralized email account that several people may access and use to manage emails together. This is a very useful feature when it comes to accessing mail in an organization where collaboration is necessary.
The main benefit is that it centralizes all communication, saving crucial messages from ending up in different inboxes. Ensuring that everyone in the team has access to the same data promotes transparency and reduces the possibility of emails getting lost.
Shared mailboxes are especially helpful for departments like project supervisors and customer service providers. It simplifies their work and boosts productivity by providing collaborative conversations so that team members can read, reply, and keep an eye on all the emails in one place.
Step-By-Step Guide To Add A Shared Mailbox In Outlook
Many users might think that adding and configuring a shared mailbox address in Outlook might be a difficult task, but after following these easy steps, you can do that quickly:
Step 1. Open Microsoft Outlook
On your device, search, and open Microsoft Outlook. Keep in mind that you are using the updated version that supports the shared mailbox feature.
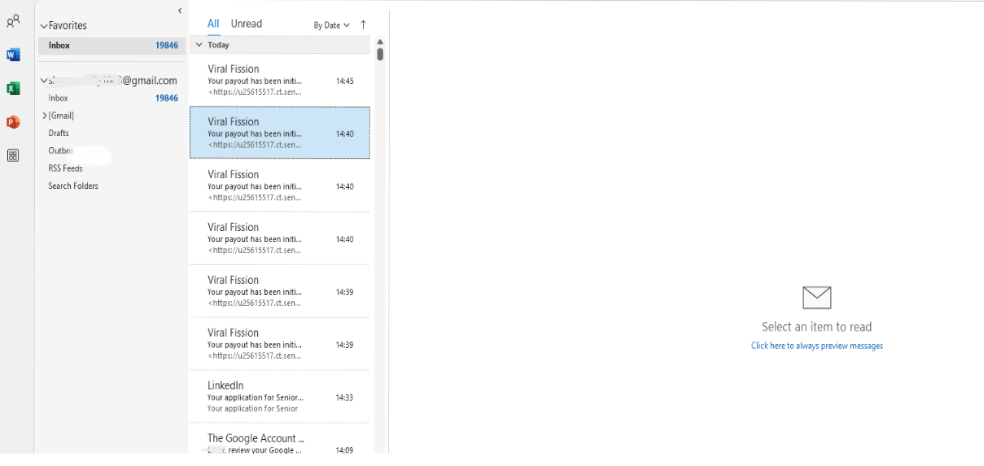
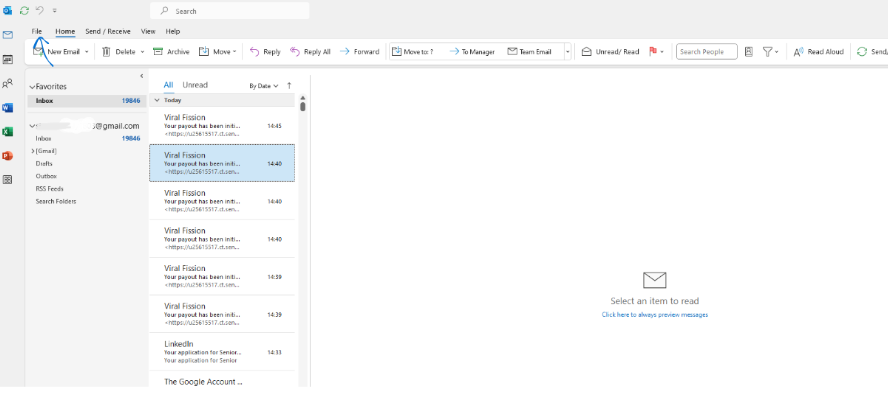
Step 2. Go To The “File” Tab
Once you have opened the application, there will be a tab named “File” in the upper left corner; click on it to open the menu.
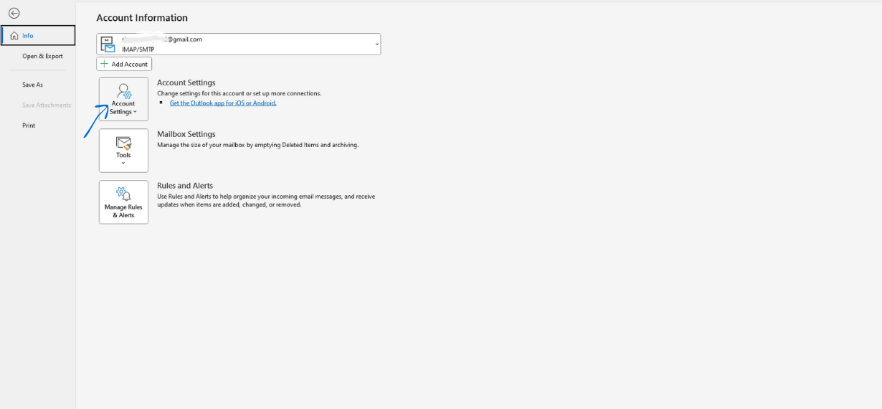
Step 3. Open “Account Settings”
When you click on the File menu, as mentioned in the above step, it will show an “Account Settings” option. Click on it to open the dropdown menu.
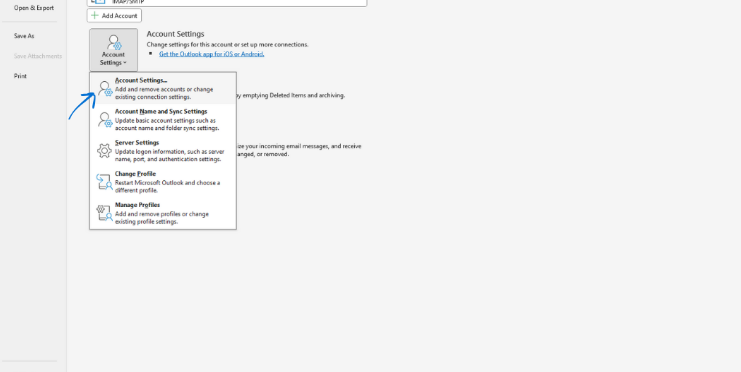
Step 4. Click On “Account Settings” In Dropdown Menu
When it shows the dropdown menu, again click on the “Account Settings” option and open it. It will take you to a new window.
Step 5. Click on “Change”.
A new window will open after clicking on the “Account Settings” option again. This window will help you to add a new email address by clicking on the option “Change.” However, ensure that the right email address is selected before clicking on the Change option because it is easy to add multiple accounts in Outlook.
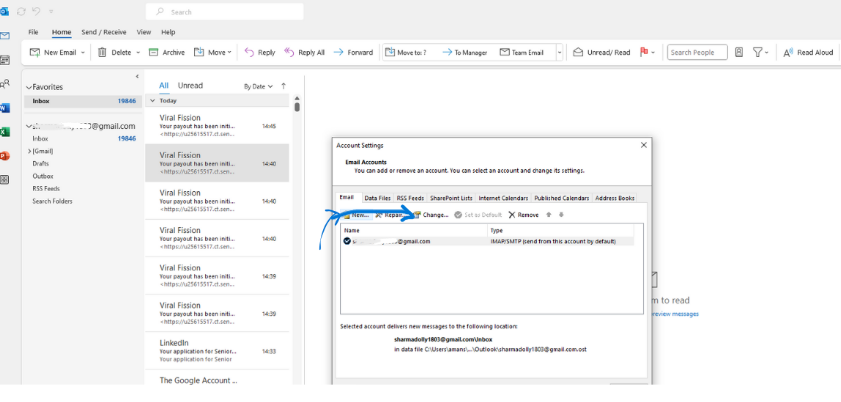
Step 6. Choose More Settings.
After clicking on the Change option, choose the More Settings option, then click on Advanced, and select Add. Now, type in the shared email address, and click on OK and again OK. Select Next > Finish > Close.
Step 8. Refresh And Check.
Once you have completed all the given steps after clicking on the “Finish” icon, restart your application and check if you have completed everything correctly or not. Once it is complete, you can see the shared mailbox added to the folders list on the left-hand side of the Outlook window.
Another Way to Add a Shared Mailbox to Outlook
Usually, the shared mailbox should appear in the “Shared with me” folder within minutes if you add the permissions in the Exchange. Nonetheless, you can try the following steps to add a shared mailbox in Outlook:
Step 1. Right-click on the Account Name.
Step 2. Click on the Inbox or Shared with Me option.
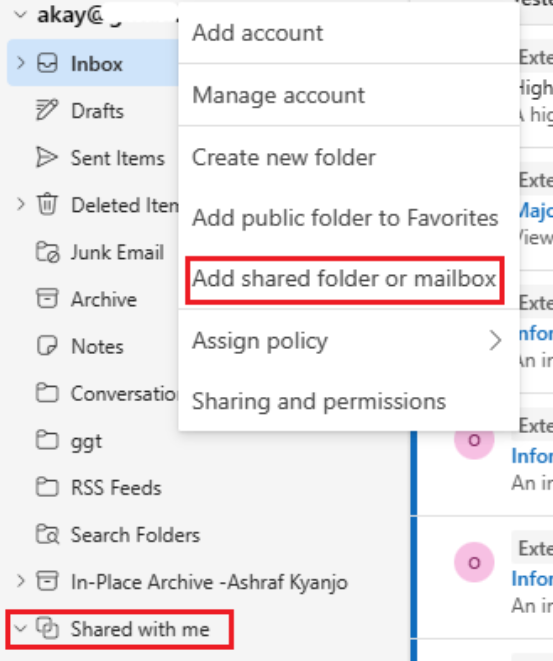
Step 3. Click on the Add shared folder or mailbox option.
Step 4. Enter the name or email address of the shared mailbox.
Step 5. Click on Add.
What is the Use of Shared Mailboxes in Outlook?
Outlook for Businesses is a centralized platform to manage emails, contacts, calendars, and tasks easily. With its different features, like the calendar to schedule meetings, contact management, and task management with functionalities, like unsend emails, email templates, and mailing lists, Outlook even offers a shared mailbox function. Multiple users can view, manage, and reply to emails from a single email address by using this function. Following are the uses and advantages of using the shared mailbox feature in Microsoft Outlook:
Flexibility And Adaptability
With shared mailboxes, you can easily adapt to an evolving team arrangement and expanding business requirements. They are easily flexible and can take on new teams, projects, or department members.
Improved Safety
Organizations can more effectively monitor safety and adopt security measures by centralizing communication through shared mailboxes. It makes evaluations easier by giving administrators a single, central place to manage and monitor interactions.
Effective Use Of Resources
Shared mailboxes help manage common resources such as company emails, general questions, or team-specific resources. This promotes more organized resource utilization, and there is no need for team members to send messages specifically to each member. Also, you can utilize mailing lists to create and send emails to a group of recipients.
Collaborative Conversations
The purpose of mailboxes is to encourage teamwork among members. A shared mailbox allows several users to access and contribute to the conversation. This feature makes it possible for all users to be aware of ongoing discussions and important emails.
Transparency And Accessibility
Shared mailboxes promote transparency by enabling all authorized users to get access to read and track emails in a common environment. Team members get updates on the current conversations or any activities that are going on between all the users.
Cost-Effectiveness
Instead of keeping a separate account for every team member, shared mailboxes can be more convenient and cost-effective. It helps in reducing costs as it saves licensing and subscription fees. This could benefit organizations that want to maximize their budget or have a large workforce without spending much.
Wrapping Up
In this detailed blog, we have covered the step-by-step guide on how to add a shared mailbox in Microsoft Outlook for those who are looking to use this feature to promote collective collaboration in handling emails. This feature of Microsoft Outlook comes with creating a professional business Outlook email address along with other benefits, such as flexibility and adaptability, which helps team members take up new projects and do collaborative communication at the same time. It also ensures safety as all of your work remains in a single place and ensures transparency.
Shared mailboxes are quite cost-effective as you don’t need to get any subscriptions to create a different account for all team members. When users become proficient in using the shared mailbox feature in Outlook, they can work more effectively in the constantly evolving environment of email communication. Users can improve their productivity and experience in Microsoft Outlook by using this feature and taking advantage of it.
Frequently Asked Questions
1. Can I add more than one shared mailbox in Microsoft Outlook?
Definitely, you can easily add multiple shared mailboxes in Microsoft Outlook. You can add as many as you want, but keep in mind the limitation as provided in your subscription to Microsoft 365.
2. How can I remove a shared mailbox in Microsoft Outlook?
Yes, just like adding a shared mailbox is an easy task, you can remove a shared mailbox whenever you want. Simply click on “Account Settings”. After that, choose the shared mailbox that you want to delete, and click on the “Delete” option.
3. What is the number of users that can access a specific shared mailbox?
The number of users that can access the shared mailbox depends on your Microsoft 365 subscription and licensing. You can check that in your subscription plan, user limitations are probably mentioned there.

Get Business Email
No domain name required


.svg%201.svg)
.svg)
.svg)
.svg%201.svg)


