


.svg)
.svg)


Get Business Email
No domain name required
Outlook Alternative
Sign up Now

Introduction
In the digital age, where effective communication is vital for business success, creating a mailing list in Outlook has become essential for small businesses and solopreneurs. This guide is designed to help you create mailing and distribution lists in Outlook. Whether you are new to Outlook or looking to refine your email management skills, this article will provide you with step-by-step instructions on creating a mailing list in Outlook and share the best practices. Let’s dive into the world of Outlook and unlock the potential of organized, efficient, and impactful email communication.
Overview of mailing and distribution lists in Outlook
For those who frequently communicate with groups - team members, clients, or stakeholders - understanding how to create a distribution list in Outlook can be a game-changer. It allows for efficient and targeted email communication without the hassle of adding recipients individually each time. While this feature has been part of Outlook since Office 2007, many users still need to learn about its capabilities and how to leverage it effectively. Understanding the functionality and benefits of mailing and distribution lists can significantly enhance your email management and communication efficiency.
What are mailing and distribution lists?
Before we dive in and create distribution lists in Outlook, let’s better understand the critical difference between them and mailing lists. Depending on your Outlook version, these terms may be used interchangeably.
- Mailing lists: A mailing list in Outlook is a collection of email addresses you can use to simultaneously send emails to multiple recipients. Instead of entering each email address individually, you create a list once and use it repeatedly. This is particularly useful for regular communication like newsletters, updates, or announcements.
- Distribution lists: Also known as contact groups in newer versions of Outlook, distribution lists are similar to mailing lists but offer more advanced features. They are ideal for more extensive and structured organizations where emails are frequently sent to specific departments, project teams, or groups within your team or organization.
Differences between mailing and distribution lists
- Usage scope: Mailing lists are generally more straightforward and suited for basic, repetitive communication. On the other hand, distribution lists are better for more complex and structured communication needs.
- Management features: Distribution lists in Outlook offer more robust management features, like adding or removing members in bulk and organizing lists into hierarchies or categories.
- Privacy controls: Distribution lists provide better privacy controls, ensuring recipients do not see other members' contact information.
- Integration with other tools: Distribution lists can be integrated with other Microsoft tools and applications, enhancing the overall productivity and collaboration within a team or organization.
Benefits of using mailing and distribution lists in Outlook
- Time efficiency: One of the most immediate benefits is the time saved. You can email multiple recipients with just a few clicks, eliminating the need to type or paste email addresses individually.
- Organizational clarity: For small businesses, keeping communication organized is crucial. These lists help segment contacts into relevant groups (like clients, suppliers, or internal teams), making managing and targeting communications easier.
- Improved privacy: Using the Bcc field for mass emails can lead to privacy concerns and errors. Distribution lists ensure each recipient sees only their own email address, maintaining confidentiality and reducing the risk of accidental 'Reply All' responses.
- Consistency in communication: Using these lists ensures that all intended recipients receive the same information simultaneously, which is essential for maintaining consistency in your communication strategy.
- Ease of maintenance: Once a list is created, it’s easy to update. Adding or removing contacts can be done quickly, ensuring your communication is always targeted to the right group of people.
Create a distribution and mailing list in Outlook.
Creating a distribution and mailing list in Microsoft Outlook is a straightforward process. Still, it does require some initial groundwork that helps ensure adequate time savings and efficient communication over long-term use.
Preparations before creating a list in Outlook
- Gather contacts: Compile a list of all the email addresses you plan to include in your mailing or distribution list. This could involve consolidating contacts from various sources, such as previous email correspondences, business cards, or CRM systems.
- Categorize contacts: Determine how you want to segment your contacts. For instance, you might create separate lists for customers, vendors, team members, or personal contacts. This segmentation will aid in sending targeted communications.
- Update contact information: Ensure that all your email addresses are current and accurate. It’s common for contact details to change, and using outdated information can lead to undelivered messages.
- Understand privacy concerns: Consider privacy, especially when sending business communications. Understand the implications of using the 'To,' 'Cc,' and 'Bcc' fields in Outlook, and decide which is most appropriate for your mailing list to maintain confidentiality.
- Plan your communication strategy: Consider how you will use the mailing or distribution list. Will it be for regular newsletters, occasional updates, or internal communications? This planning helps in structuring your inventory more effectively.
Creating a distribution and mailing list in Outlook
Here's a detailed guide to help you set up your first distribution and mailing list in Outlook.
Step 1: Open Outlook and navigate to contacts
- Launch your Microsoft Outlook application.
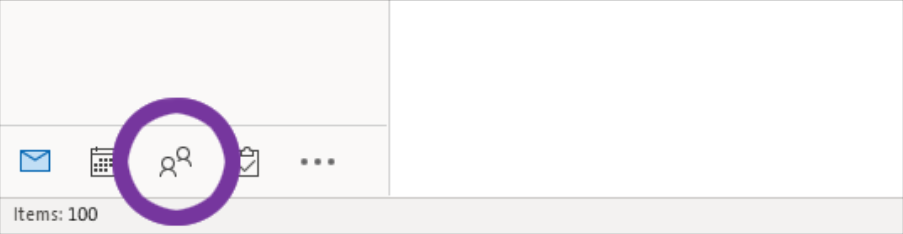
- Go to the navigation pane at the left or bottom left of the screen and click on the 'People' icon, previously known as 'Contacts.' This will display all your saved contacts in Outlook.
Step 2: Create a new contact group
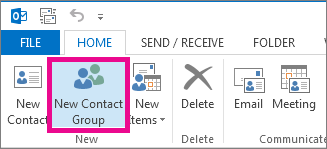
- In the 'Home' tab, locate the 'New Contact Group' button in the 'New' group. Click on it.
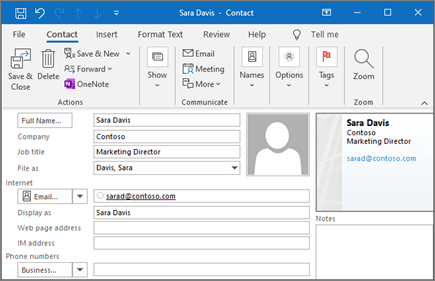
- This action opens a new window titled 'Contact Group,' where you can start building your mailing list.
Step 3: Name your contact group
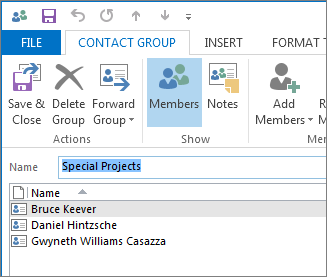
- You'll find a field labeled ' Name ' at the top of the 'Contact Group' window. Enter a descriptive and recognizable name for your mailing list here. This could be something like “Marketing Team” or “Special Projects”.

Step 4: Add members to your group
- You’ll see an option for 'Add Members' in the' Contact Group' tab. Click on it.
- You can add members from your existing Outlook contacts or from an address book, or you can manually type email addresses.
- Select ‘From Outlook Contacts’ or ‘From Address Book’ to add existing contacts. A dialogue box will appear with your contacts list.
- Click on the names you want to add, then click the 'Members' button to include them in your mailing list. If the contacts are outside your address book, you can type email addresses directly into the 'Members' field.
Step 5: Organize your contact group
- Once you have added all the necessary contacts, you can organize them within the group.
- Use the 'Notes' section at the bottom of the window to add any relevant information about the group, such as its purpose or guidelines.
Step 6: Save and close
- After adding all the members and organizing your group, click 'Save & Close' in the upper-left corner of the 'Contact Group' window.
- Your new mailing list will now appear in your contacts under the name you have given it.
Step 7: Using your mailing list
- To use your new mailing list, start composing a new email.
- In the 'To' field, start typing the name of your mailing list. Outlook will auto-suggest your group. Select it, and it automatically populates the email address field with all your list members.
Editing and managing your distribution and mailing list in Outlook
Efficient management of your distribution and mailing lists ensures that your communication remains relevant and practical, reaching the right people at the right time. By routinely updating and organizing your lists, you maintain the integrity of your communications and enhance your overall productivity in Outlook. Here are some critical steps and tips to efficiently manage your mailing list.
Adding contacts to your mailing list
- Open Your Mailing List: In Outlook, navigate to your mailing list under the 'People' tab.
- Add new members: Click 'Add Members' and choose from your Outlook contacts or manually enter new email addresses.
- Save your changes: Remember to save the updated list after adding new contacts.
Removing contacts
- Access the mailing list: Open the list you wish to edit.
- Select the contact: Choose the contact you want to remove and right-click on their name.
- Remove and save: Select 'Remove Member' and save your changes.
Keeping your mailing list updated:
- Regularly review your mailing list for accuracy.
- Remove outdated or incorrect email addresses.
- Add new contacts as your network grows or changes.
Setting permissions and managing access
- You may choose who can view or edit the mailing list depending on your needs.
- In the list properties, set permissions for added privacy or restricted access.
Tips for efficient mailing list management
- Periodically verify the relevance of your list's contacts.
- For better organization, categorize your mailing lists (e.g., clients, suppliers, team members).
- Regularly back up your mailing lists to prevent data loss.
Conclusion
Mastering the creation of mailing and distribution lists in Outlook can significantly streamline your email communication. Once you create a distribution or mailing list, you’ll save more time while continuing to efficiently reach out to specific groups with targeted and meaningful messages.
Get Business Email
No domain name required
Outlook Alternative
Sign up Now