Get Business Email
No domain name required
Introduction
Did you know that Outlook email has about 400 million global subscribers? It is the largest competitor of Gmail. Love or loathe them, emails are an integral part of our personal lives and the business world. At work, we dedicate significant time to sending similar content to diverse recipients - be it routine customer updates or weekly reports to our bosses. When sending these emails, we often neglect to insert crucial details such as updating the subject line, mentioning product updates, or addressing different contacts. This oversight is widespread in routine, repetitive emails.
Here's some good news if you’re encountering similar challenges. You can streamline your workflow with Outlook’s email templates. These templates eliminate the need for copying and pasting previous emails into new messages and prevent oversights. Users can reclaim hours of lost productivity by learning how to create and use Outlook’s email templates. With just a click, they can reuse messages, saving time and effort. But how do you make and utilize email templates in Outlook for regular correspondence? Read on to know more.
What Are Outlook Email Templates?
An email template is a message or layout that is reusable. Rather than composing emails anew, templates enable you to use saved text sourced from other relevant content. Users can use one template repeatedly with minor or significant modifications as necessary. This ensures consistency across email communications and saves a ton of time. With Outlook, creating and accessing templates on its desktop app and website is easy.
How to Create and Use an Email Template in Outlook : 3 Ways
Microsoft has a built-in email template feature, allowing you to create predefined email content. Skip “Ctrl+C, Ctrl+V.” Discover something better. Speed up the creation of those mundane, repetitive emails using Outlook email templates.
How to Create Email Template in Outlook
Way 1. Create a Template on Windows
- Once you open Outlook, click on the " Home " tab and select “New Email.”
- A compose window will show up. Here, you can type out your message in the body of the mail.
Pro tip: the template allows you to set up a subject line and choose one or more recipients.
- You will notice that default email signatures appear automatically at this stage. So, it is best to remove the signature from the template. After this, click “File” and “Save As.” In the “Save as type” field, choose “Outlook Template.” Change the file name to something that fits your purpose.

- Although Outlook templates are saved at a default location, you can change this by choosing your preferred location and clicking “Save.”
Pro tip: You can take it a step further and schedule the delivery of your Outlook emails.
Way 2. Create a Template on Mac
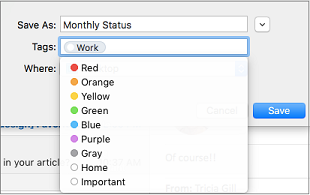
If you are a Mac user, the steps are the same as those for Windows. Upon opening Outlook and composing a new email, you can save it as a template for future reuse. The sole distinction is that, upon saving, you can select from various tags such as “work,” “important,” “blue,” “red,” and so forth. This helps to segregate your mail.

Way 3: Create a Template on The Web
- When crafting a template online, after covering the basics like opening Outlook and creating a new email, do not enter any message in the email box on your screen.
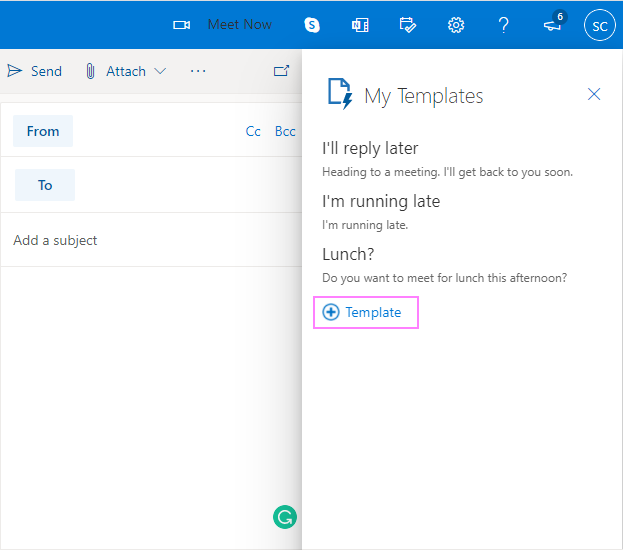
- Instead, click “More Options” or the three dots on the top right-hand side and select “My Templates.”
- In the pop-up box, select “Template” to add your new template.
- Enter an appropriate title for the template of your message in the body, and then hit “Save.”
How To Use Your Outlook Email Template
Developing a template is just one aspect of email communication. Now, let's explore how to put it into action. Inserting your email template into your message takes less than a minute.
Way 1: Use an Email Template on Windows
With Windows, opening a template depends on where you have saved it. It can be opened from two locations.
In the default location
- In the “Home” tab from the drop-down menu, pick “New Items.” Then select “More Items > Choose Form.”
- Next, from the “Look in” field in the drop-down list, choose “User Templates in File System.”
- Select the template from the list on the screen and click “Open.”

- The template will now open in the new email compose window. Feel free to customize this according to your preferences or send it out as it is.
From a selected location
- Determine where the template is saved, then navigate to that location. Once you locate it, click on the template.
- It will open in a new email compose window in Outlook. And voila, you’re ready to go!
Way 2: Use an Email Template on Mac
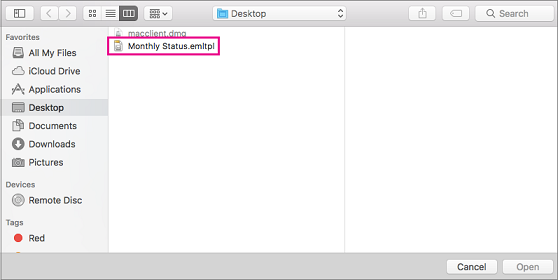
- You must go to “File” and then select “New”.
- After that, select “Email from the template.”
- Next, click on “Open”.

- This action will open the template in a new email compose window.
Way 3: Use an Email Template on the Web
- After you open a new email, click on the toolbar on the right-hand side to select “More Options.”
- Then, choose “My Templates.” Once you select the template, it will open in the new message window.
- Now, the template is ready for you to customize or send out as it is.
How To Edit An Existing Template
Pre-existing templates can be edited. So can templates you create. It’s as simple as making changes to a Word document file. Simply open, edit, and save!
Edit a Template on Windows
- Follow the steps mentioned earlier to open a template.
- You can make the necessary changes after it opens in the new email compose window.
- Navigate to the menu, click “File,” then select “Save as.”
- Choose “Outlook Template” in the drop-down list and input the file name. You can either replace or overwrite the existing file with the new template.

Edit Template on Mac
When editing templates on Mac, the steps closely resemble the Windows process with minimal differences. The prompts may vary slightly in language, but overall, following the steps outlined above should guide you smoothly through the process.
Edit Template on the Web
To begin, navigate to either "New Items" or "More Items" and select "Form." In the "Look In:" box, opt for "User Templates in File System." Choose the relevant form and click "Open." Now, input the necessary information, and with a final click on "Send," you're all set.
Five Advanced Add-Ins That Elevate Your Outlook Email Experience
Explore a heightened Outlook email experience with these five advanced add-ins to enhance productivity and efficiency.
Boomerang
We have all been there – the ideal email pitch forms in your mind while grocery shopping. However, when you get home, the essential points slip from memory. In such situations, the perfect remedy is Boomerang. You can note your thoughts in the email, return home to refine them, and send them precisely when you want to, whether in two hours or two days.
Among its numerous features, Boomerang notifies senders when recipients view their email, even if they do not respond. It also supports the tracking of opened links. Additional features encompass email updates, scheduling recurring messages, pausing your inbox, and snoozing your emails.
Text Lightning
Time saved is time earned, and Text Lightning is here to assist. It resolves your issue of email overload.
Text Lightning provides immediate access to similar texts from past emails, resulting in better-written and more detailed responses. You only need to craft a response once. Reuse it as required later. You can use advanced functionalities to set up conditional responses based on various variables. This allows for applying different templates tailored to the specific responses you intend to send.
ClearContext
Does your inbox resemble an overgrown jungle, demanding a guide to help you navigate it? Well, it’s time to say hello to ClearContext, your digital compass. The email management tool integrates seamlessly with your inbox, making it cleaner, leaner, organized, and, most importantly, manageable.
Whether you want to save important emails or your goal is Inbox Zero (an approach to decluttering your inbox), ClearContext acts like your personal assistant. Its “AutoFile” feature declutters your inbox by categorizing automated emails for later review. “File Sent Messages” organizes received messages. The “Emails to Tasks and Appointments” feature functions quickly to convert emails into tasks or appointments. The “Snooze” option allows you to mute inbox distractions temporarily. ClearContext enables you to assign emails as to-do lists, easily create projects, and streamline your email experience.
Meister Task
Managing tasks and resources can become challenging when your team or business expands. Businesses can put their paper and pen to-do list aside to think bigger with a more scalable solution like MeisterTask. It is an organizational tool that visualizes tasks and makes them trackable.
MeisterTask converts emails into tasks in a more visual way. Rather than the typical to-do list, it allows you to create flexible project boards. The idea is that checking off tasks becomes more manageable when you can visually perceive them—daunted by large tasks? Break them down into smaller, achievable subtasks. With consistency, transparency, and task-focused interactions, Meister Task improves communication through chat or email. So, managing your workflow becomes simpler and more straightforward.
Duplicate Remover
Most of us have encountered the scenario when we receive an email notifying us, "Your storage is almost full.”
No mailbox does not provide infinite storage. You may have also accumulated some junk emails that require deletion. Duplicate Remover does just that. It automatically finds and deletes duplicate emails, contacts in your address book, calendar invites, and attachments. But don’t worry. You won’t lose anything as you can double-check your duplicates before you delete them. Removing duplicate emails opens up storage space, leading to a more responsive email experience.
Wrapping up
Email templates is a total game-changer. The only thing more exciting than hitting “send” is the sheer joy of not having to type the same thing repeatedly. Craft personalized templates for your specific needs and simplify your email workflow. They save us a lot of time and effort. Make your Outlook email experience more streamlined than ever before. Experience the enhanced customization in every message you send through Outlook email templates.

Get Business Email
No domain name required


.svg%201.svg)
.svg)
.svg)
.svg%201.svg)


